WPF
命名空间
WPF 客户端/框架 XAML 命名空间映射为默认命名空间:xmlns="http://schemas.microsoft.com/winfx/2006/xaml/presentation"
单独的 XAML 命名空间,通常将其映射到 x: 前缀:xmlns:x="http://schemas.microsoft.com/winfx/2006/xaml"
映射到自定义类和程序集:xmlns:custom="clr-namespace:SDKSample;assembly=SDKSampleLibrary" or xmlns:custom="using:SDKSample;assembly=SDKSampleLibrary"
映射到System程序集:xmlns:sys="clr-namespace:System;assembly=mscorlib"
映射到自定义类和程序集
clr-namespace: 在程序集中声明的 CLR 命名空间,此程序集包含要作为元素公开的公共类型。
assembly= 包含部分或全部引用的 CLR 命名空间的程序集。 此值通常为程序集的名称而不是路径,且不包含扩展名(例如 .dll 或 .exe)。 程序集路径必须创建为包含要映射的 XAML 的项目文件中的项目引用。 为了并入版本控制和强名称签名, assembly 该值可以是由 AssemblyName 定义的字符串,而不是简单的字符串名称。
请注意,分隔 clr-namespace 标记和其值的字符是冒号 (:),而分隔 assembly 标记和其值的字符为等号 (=)。 这两个标记之间应使用的字符是分号。 此外,不要在声明中的任何位置包含任何空白。
如果要在与引用自定义类的应用程序代码相同的程序集内定义引用的 clr-namespace,则可省略 assembly。
xmlns:sys="clr-namespace:System;assembly=mscorlib"
xmlns:custom="clr-namespace:SDKSample;assembly=SDKSampleLibrary"

namespace SDKSample {
    public class ExampleClass : ContentControl {
        public ExampleClass() {
        ...
        }
    }
}
x:key、x:name、name
- Name——Name属性定义在FrameworkElement类中,这个类是WPF控件的基类,所以所有WPF控件都具有Name这个属性
- x:Name——用在Xaml中时,声明一个变量。x:Name的功能涵盖了Name属性的功能,所以全部使用x:Name以增强代码的统一性和可读性。
- x: Key——唯一地标识作为资源创建和引用且存在于 ResourceDictionary 中的元素。
- x:key和x:name的区别,前者是为XAML中定义的资源文件提供唯一的标识,后者是为XAML中定义的控件元素提供唯一标识。
WPF资源
每个元素都有自己的资源集合,为了找到期望的资源,WPF在元素树中进行递归搜索。只要不在同一集合中多次使用相同的资源名,就可以重用资源名称。可在资源部分中实例化任何.NET类(包括自定义类),只要该类是XAML友好的即可。这意味着该类需要一些基本特性,如公有的无参构造函数和可写的属性。
Attribute & Property
可通过特性(attribute)设置每个类的属性(proterty)。对于XML,每个元素都可以有特性;对于C#,每个类都可以有属性。只是名称不一样而已,为了区分才定义为不同的名称。
XAML
XAML只是一个WPF的页面配置文件,在实际运行时,XAML并不包含在WPF程序中,那么XAML在何时起作用的?程序在编译时,会使用XAML解析器对XAML文件进行编译,编译的结果为C#部分类,然后C#编译器把这个部分类合并到主程序中,页面渲染的时候是通过这个部分类把把控件显示出来的。
当XAML解析器解析XAML文件时,遇到Window控件名,它需要命名空间确认Window控件名是WPF的控件还是用户自己定义的控件,所谓命名空间就是起这个作用。
命名空间
按约定,在XAML文档中需要使用的所有名称空间应在第一个标签中声明,正如在这个示例中所做的那样。一旦声明一个名称空间,在文档中的任何地方都可以使用该名称空间。
绑定四大属性
- 绑定源,记住绑定源指的是对象;
- 绑定路径,可以完全理解为绑定源的某个属性。记住绑定路径指的是绑定源对象里的某个属性;
- 绑定目标对象,TextBox和TextBlock对象;
- 绑定目标属性,TextBox和TextBlock对象的Text属性;记住目标属性一定是依赖项属性。如果想实现一个自定义控件的属性,并且希望这个属性也可以像WPF官方控件一样绑定一个绑定源,那么也要按照依赖项属性形式实现一个属性。每个Dependency属性本身都会在修改属性值时调用INotifyPropertyChanged。
INotifyPropertyChanged接口
如果希望绑定源的每一次改变都能反映到绑定目标的属性值的改变上,那么 需要实现INotifyPropertyChanged接口。
using System;
using System.ComponentModel;
using System.Runtime.CompilerServices;

namespace WpfApp1
{
    public class Class_Book : INotifyPropertyChanged
    {
        public event PropertyChangedEventHandler PropertyChanged;
        private void NotifyPropertyChanged([CallerMemberName] String propertyName = "")
        {
            PropertyChanged?.Invoke(this, new PropertyChangedEventArgs(propertyName));
        }

        private string title;

        public string Title
        {
            get { return title; }
            set
            {
                title = value;
                PropertyChanged?.Invoke(this, new PropertyChangedEventArgs("Title"));
            }
        }

        private string isbn;

        public string Isbn
        {
            get { return isbn; }
            set
            {
                isbn = value;
                NotifyPropertyChanged();
            }
        }

    }
}
UpdateSourceTrigger
<TextBox Text="{Binding mytext,UpdateSourceTrigger=PropertyChanged}" Width="100" Margin="5"></TextBox> 1. LostFocus,当控件失去焦点时改变源属性值,TextBox的UpdateSourceTrigger属性是默认是LostFocus; 1. PropertyChanged,每当控件的属性值改变都立即改变源属性值; 1. Explicit,用户自己通过调用UpdateSource方法来改变源属性的值,控制权在用户手上。
依赖属性
必须用static readonly声明,否则有被二次修改的可能,一旦被修改,获取的变量就不唯一了。当然,如果重复注册,程序是肯定会报错的,这里主要是为了防止二次注册不同参数名的依赖属性。static readonly意味着只能在静态构造函数中对其进行设置。
using System;
using System.ComponentModel;
using System.Runtime.CompilerServices;
using System.Windows;

namespace WpfApp1
{
    public class Class_Book : DependencyObject
    {
		//依赖属性一般需要以…Property结尾。这样符合WPF的命名规范。
        public static readonly DependencyProperty AuthorDependencyProperty = DependencyProperty.Register("Author", typeof(string), typeof(Class_Book));

		//CLR封装(wrapper)是可选的,不过经过封装之后,这样对于外界来说,DependencyProperty就和传统属性没有什么区别了,实现了完全的“向下兼容”。就是说如果没有定义CLR风格的Author属性,绑定一样可以使用,绑定的Path为DependencyProperty.Register的第一个参数。且依赖属性具有高优先级,也就是意味着绑定会先查找依赖属性,如果有同名的依赖属性,则直接绑定到依赖属性上,哪怕CLR属性也有一个同名的属性,绑定与CLR属性无关,除非没有找到同名的依赖属性,绑定才会发生到该CLR属性上。
        public string Author
        {
            get
            {
                return (string)GetValue(AuthorDependencyProperty);
            }
            set
            {
                SetValue(AuthorDependencyProperty, value);
            }
        }
    }
}


using System;
using System.Collections.Generic;
using System.Linq;
using System.Text;
using System.Threading.Tasks;
using System.Windows;
using System.Windows.Controls;
using System.Windows.Data;
using System.Windows.Documents;
using System.Windows.Input;
using System.Windows.Media;
using System.Windows.Media.Imaging;
using System.Windows.Navigation;
using System.Windows.Shapes;

namespace WpfApp1
{
    /// <summary>
    /// Interaction logic for MainWindow.xaml
    /// </summary>
    public partial class MainWindow : Window
    {
        Class_Book book = new Class_Book();
        public MainWindow()
        {
            InitializeComponent();

			//直接设置绑定路径
            this.DataContext = book;
            this.Age1.SetBinding(TextBox.TextProperty, "Age");
            this.Age2.SetBinding(TextBox.TextProperty, "Age");

			//创建绑定对象进行绑定
            Binding binding = new Binding("Author") { Source = book };
            this.Author5.SetBinding(TextBox.TextProperty, binding);
            this.Author6.SetBinding(TextBox.TextProperty, binding);
        }

        private void Button_Update_Click(object sender, RoutedEventArgs e)
        {
            this.book.Author = "Michael";
        }
    }
}


<TextBox Text="{Binding Author}"></TextBox>
<TextBox Text="{Binding Author}"></TextBox>
<Button  Name="Button_Update" Content="Update" Click="Button_Update_Click"></Button>
依赖性属性检索优先级
- 默认值
- 继承而来的值,FrameworkPropertyMetadata.Inherits=true
- 来自主题样式的值
- 来自项目样式的值
- 本地值(使用代码或XAML设置的值)
路由事件
路由事件与依赖项属性一样,由只读的静态字段表示,在静态构造函数中注册,并通过标准的.NET事件定义进行封装。
public static readonly RoutedEvent ColorChangedEvent = EventManager.RegisterRoutedEvent("ColorChanged", RoutingStrategy.Bubble, typeof(RoutedPropertyChangedEventHandler<Color>), typeof(ColorPickerUserControl));

public event RoutedPropertyChangedEventHandler<Color> ColorChanged
{
    add { AddHandler(ColorChangedEvent, value); }
    remove { RemoveHandler(ColorChangedEvent, value); }
}
事件访问器
通常这些访问器由编译器提供。我们可以通过为事件定义事件访问器,来控制事件运算符+=、-=运算符的行为。
访问器声明由一个添加访问器声明和一个移除访问器声明组成。每个访问器声明包含标记 add 或 remove,后跟一个块。与添加访问器声明相关联的块指定添加事件处理程序时要执行的语句,而与移除访问器声明相关联的块指定移除事件处理程序时要执行的语句。
每个添加访问器声明和移除访问器声明相当于一个方法,它具有一个属于事件类型的值参数并且其返回类型为 void。事件访问器的隐式参数名为 value。当事件用在事件赋值中时,就会调用适当的事件访问器。具体说来,如果赋值运算符为 +=,则使用添加访问器,而如果赋值运算符为 -=,则使用移除访问器。在两种情况下,赋值运算符的右操作数都用作事件访问器的参数。添加访问器声明或移除访问器声明的块必须遵循适用于 void 方法的规则。具体说来,不允许此类块中的 return 语句指定表达式。
由于事件访问器隐式具有一个名为 value 的参数,因此在事件访问器中声明的局部变量或常数若使用该名称,就会导致一个编译时错误。
//对于如此的代码,
class EventInCS3
{
    public event EventHandler Done;
}

//编译器会将其转换成:
class EventInCS3
{
    private EventHandler __Done; // 1
    public event EventHandler Done
    {
        add
        {
            lock (this) // 2
            {
                __Done = __Done + value; // 3
            }
        }
        remove
        {
            lock (this) { __Done = __Done - value; }
        }
    }
}
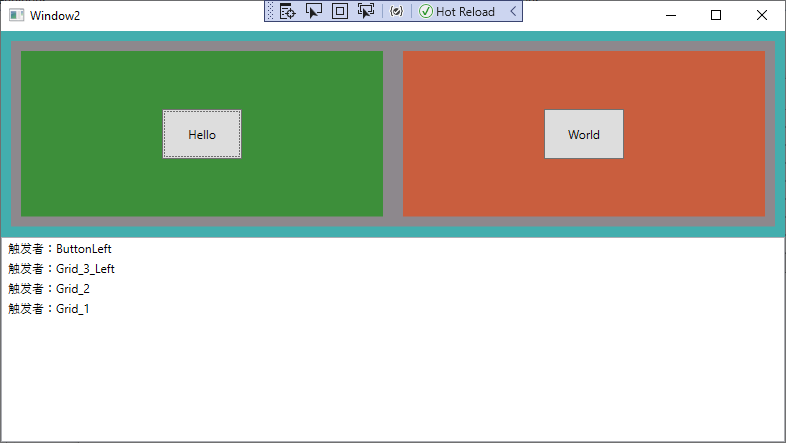
路由事件 - 冒泡
由事件源向上传递一直到根元素
<Window x:Class="WpfApp1.Window2"
        xmlns="http://schemas.microsoft.com/winfx/2006/xaml/presentation"
        xmlns:x="http://schemas.microsoft.com/winfx/2006/xaml"
        xmlns:d="http://schemas.microsoft.com/expression/blend/2008"
        xmlns:mc="http://schemas.openxmlformats.org/markup-compatibility/2006"
        xmlns:local="clr-namespace:WpfApp1"
        mc:Ignorable="d"
        Title="Window2" Height="450" Width="800">
    <Grid Button.Click="Btn_Click" Name="Grid_1" Background="#FF43AEAE">
        <Grid.RowDefinitions>
            <RowDefinition></RowDefinition>
            <RowDefinition></RowDefinition>
        </Grid.RowDefinitions>
        <Grid Button.Click="Btn_Click" Name="Grid_2"  Margin="10" Background="#FF8D888D" Grid.Row="0">
            <Grid.ColumnDefinitions>
                <ColumnDefinition></ColumnDefinition>
                <ColumnDefinition></ColumnDefinition>
            </Grid.ColumnDefinitions>
            <Grid Button.Click="Btn_Click" Name="Grid_3_Left" Grid.Column="0" Background="#FF3D8F3A" Margin="10">
                 <Button Button.Click="Btn_Click" Name="ButtonLeft" Width="80" Height="50" Content="Hello"/>
            </Grid>
            <Grid Button.Click="Btn_Click" Name="Grid_3_Right" Grid.Column="1" Background="#FFC95E3E" Margin="10">
                <Button Button.Click="Btn_Click" Name="ButtonRight" Width="80" Height="50" Margin="10" Content="World"></Button>
            </Grid>
        </Grid>
        <ListBox Name="Print_List"  Grid.Row="1"/>
    </Grid>
</Window>


public partial class Window2 : Window
{
    public Window2()
    {
        InitializeComponent();
    }
    private void Btn_Click(object sender, RoutedEventArgs e)
    {
        string message = "触发者:" + (sender as FrameworkElement).Name.ToString();
        this.Print_List.Items.Add(message);
        //e.Handled = true;
    }
}
路由事件 - 隧道
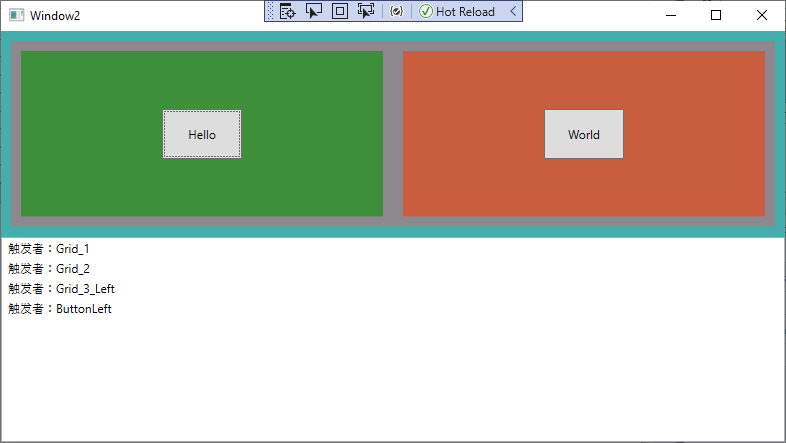
从元素树的根部调用事件处理程序并依次向下深入直到事件源,所有的隧道事件都以Preview开头。
<Window x:Class="WpfApp1.Window2"
        xmlns="http://schemas.microsoft.com/winfx/2006/xaml/presentation"
        xmlns:x="http://schemas.microsoft.com/winfx/2006/xaml"
        xmlns:d="http://schemas.microsoft.com/expression/blend/2008"
        xmlns:mc="http://schemas.openxmlformats.org/markup-compatibility/2006"
        xmlns:local="clr-namespace:WpfApp1"
        mc:Ignorable="d"
        Title="Window2" Height="450" Width="800">
    <Grid PreviewMouseDown="Btn_Click" Name="Grid_1" Background="#FF43AEAE">
        <Grid.RowDefinitions>
            <RowDefinition></RowDefinition>
            <RowDefinition></RowDefinition>
        </Grid.RowDefinitions>
        <Grid PreviewMouseDown="Btn_Click" Name="Grid_2"  Margin="10" Background="#FF8D888D" Grid.Row="0">
            <Grid.ColumnDefinitions>
                <ColumnDefinition></ColumnDefinition>
                <ColumnDefinition></ColumnDefinition>
            </Grid.ColumnDefinitions>
            <Grid PreviewMouseDown="Btn_Click" Name="Grid_3_Left" Grid.Column="0" Background="#FF3D8F3A" Margin="10">
                 <Button PreviewMouseDown="Btn_Click" Name="ButtonLeft" Width="80" Height="50" Content="Hello"/>
            </Grid>
            <Grid PreviewMouseDown="Btn_Click" Name="Grid_3_Right" Grid.Column="1" Background="#FFC95E3E" Margin="10">
                <Button PreviewMouseDown="Btn_Click" Name="ButtonRight" Width="80" Height="50" Margin="10" Content="World"></Button>
            </Grid>
        </Grid>
        <ListBox Name="Print_List"  Grid.Row="1"/>
    </Grid>
</Window>

public partial class Window2 : Window
{
    public Window2()
    {
        InitializeComponent();
    }
    private void Btn_Click(object sender, RoutedEventArgs e)
    {
        string message = "触发者:" + (sender as FrameworkElement).Name.ToString();
        this.Print_List.Items.Add(message);
        //e.Handled = true;
    }
}
UIElement.AddHandler
使用AddHandler 方法处理已经被(e.Handled=true)处理的事件。
AddHandler 方法有一个AddHandler(RoutedEvent, Delegate, Boolean) 的重载。第一个参数表示指定的路由事件;第二个参数指定事件的处理函数;第三个参数表明是否在事件被标记为已处理的情况(e.Handled=true)下还继续处理该事件。
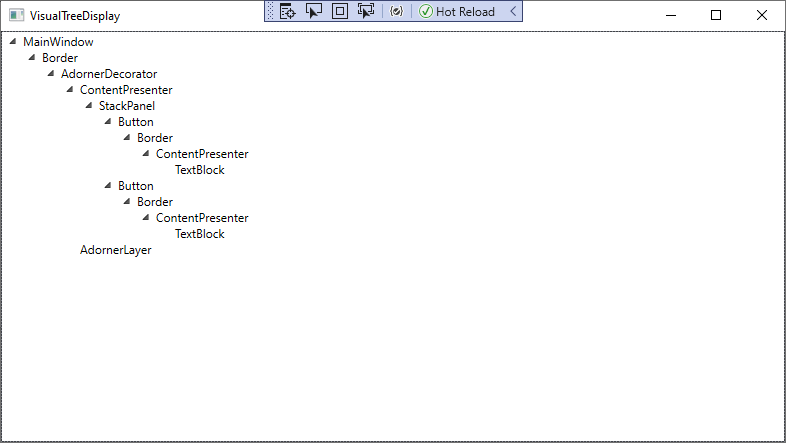
显示可视化树
private void Button_Click(object sender, RoutedEventArgs e)
{
    VisualTreeDisplay treeDisplay = new VisualTreeDisplay();
    treeDisplay.ShowVisualTree(this);
    treeDisplay.Show();
}

<Window x:Class="WpfApp3.VisualTreeDisplay"
        xmlns="http://schemas.microsoft.com/winfx/2006/xaml/presentation"
        xmlns:x="http://schemas.microsoft.com/winfx/2006/xaml"
        xmlns:d="http://schemas.microsoft.com/expression/blend/2008"
        xmlns:mc="http://schemas.openxmlformats.org/markup-compatibility/2006"
        xmlns:local="clr-namespace:WpfApp3"
        mc:Ignorable="d"
        Title="VisualTreeDisplay" Height="450" Width="800">
    <Grid>
        <TreeView x:Name="treeElements" />
    </Grid>
</Window>

/// <summary>
/// Interaction logic for Window1.xaml
/// </summary>
public partial class VisualTreeDisplay : Window
{
    public VisualTreeDisplay()
    {
        InitializeComponent();
    }

    public void ShowVisualTree(DependencyObject element)
    {
        treeElements.Items.Clear();
        ProcessEleemnt(element, null);
    }

    private void ProcessEleemnt(DependencyObject element, TreeViewItem previousItem)
    {
        TreeViewItem item = new TreeViewItem();
        item.Header = element.GetType().Name;
        item.IsExpanded = true;

        if (previousItem == null)
        {
            treeElements.Items.Add(item);
        }
        else
        {
            previousItem.Items.Add(item);
        }

        for (int i = 0; i < VisualTreeHelper.GetChildrenCount(element); i++)
        {
            ProcessEleemnt(VisualTreeHelper.GetChild(element, i), item);
        }
    }
}
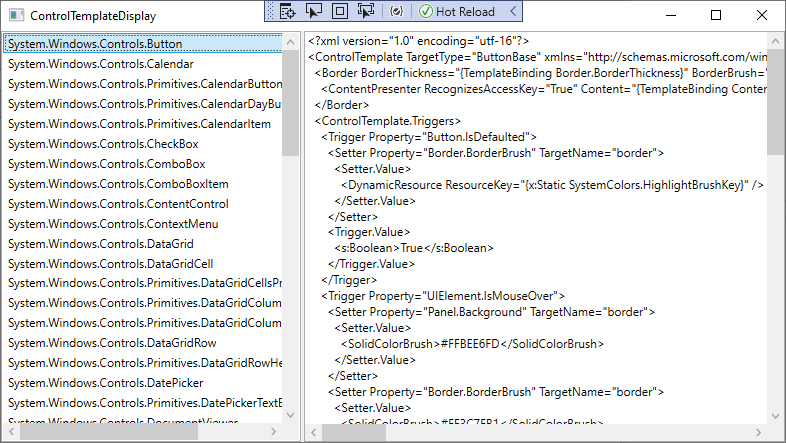
显示控件模板
private void Button_Click(object sender, RoutedEventArgs e)
{
    ControlTemplateDisplay controlTemplateDisplay = new ControlTemplateDisplay();
    controlTemplateDisplay.Show();
}

<Window x:Class="WpfApp3.ControlTemplateDisplay"
        xmlns="http://schemas.microsoft.com/winfx/2006/xaml/presentation"
        xmlns:x="http://schemas.microsoft.com/winfx/2006/xaml"
        xmlns:d="http://schemas.microsoft.com/expression/blend/2008"
        xmlns:mc="http://schemas.openxmlformats.org/markup-compatibility/2006"
        xmlns:local="clr-namespace:WpfApp3"
        mc:Ignorable="d"
        Title="ControlTemplateDisplay" Height="450" Width="800" Loaded="Window_Loaded">
    <Grid x:Name="grid">
        <Grid.ColumnDefinitions>
            <ColumnDefinition Width="300"></ColumnDefinition>
            <ColumnDefinition Width="Auto" ></ColumnDefinition>
            <ColumnDefinition Width="*"></ColumnDefinition>
        </Grid.ColumnDefinitions>

        <ListBox x:Name="lstTypes" Grid.Row="0" Grid.Column="0" SelectionChanged="lstTypes_SelectionChanged"></ListBox>

        <GridSplitter Width="3" Grid.Row="0" Grid.Column="1" VerticalAlignment="Stretch" HorizontalAlignment="Center" ></GridSplitter>

        <TextBox x:Name="txtTemplate" Grid.Row="0" Grid.Column="2" IsReadOnly="True" VerticalScrollBarVisibility="Auto" HorizontalScrollBarVisibility="Auto"></TextBox>
    </Grid>
</Window>

public partial class ControlTemplateDisplay : Window
{
    public ControlTemplateDisplay()
    {
        InitializeComponent();
    }

    private void Window_Loaded(object sender, RoutedEventArgs e)
    {
        Type controlType = typeof(Control);
        List<Type> derivedTypes = new List<Type>();

        Assembly assembly = Assembly.GetAssembly(typeof(Control));
        foreach (Type type in assembly.GetTypes())
        {
            if (type.IsSubclassOf(controlType) && !type.IsAbstract && type.IsPublic)
            {
                derivedTypes.Add(type);
            }
        }

        derivedTypes.Sort(new TypeComparer());

        lstTypes.ItemsSource = derivedTypes;
    }

    private void lstTypes_SelectionChanged(object sender, SelectionChangedEventArgs e)
    {
        try
        {
            Type type = (Type)lstTypes.SelectedItem;

            ConstructorInfo info = type.GetConstructor(System.Type.EmptyTypes);
            Control control = (Control)info.Invoke(null);

            control.Visibility = Visibility.Collapsed;
            grid.Children.Add(control);

            ControlTemplate template = control.Template;

            XmlWriterSettings settings = new XmlWriterSettings();
            settings.Indent = true;
            StringBuilder sb = new StringBuilder();
            XmlWriter writer = XmlWriter.Create(sb, settings);
            XamlWriter.Save(template, writer);

            txtTemplate.Text = sb.ToString();

            grid.Children.Remove(control);
        }
        catch (Exception err)
        {
            txtTemplate.Text = "<< Error generating template: " + err.Message + ">>";
        }
    }
}

public class TypeComparer : IComparer<Type>
{
    public int Compare(Type x, Type y)
    {
        return x.Name.CompareTo(y.Name);
    }
}
背景线程更新UI
Application.Current.Dispatcher.Invoke(() =>
{
    this.WebSocketConnectCommand.NotifyCanExecuteChanged();
    this.WebSocketCloseCommand.NotifyCanExecuteChanged();
});
Unicode
由于XAML是XML的一个扩展,所以XAML中用unicode码来表示字符的方式与XML相同。格式为&#x**;前三位固定为&#x,后面四位代表Unicode码值,分号不能省略。
//内容是一个上箭头的按钮
<Button Content="↑" />