install
Password: !Quarter0
截图工具:Screenshot
Ubuntu版注册表工具:
sudo apt install dconf-editor
安装SSH服务器:
sudo apt install openssh-server
sudo apt install putty
#添加/etc/ssh/sshd_config配置
AllowUsers michael
TigerVNC: sudo apt install tigervnc-standalone-server tigervnc-viewer
X11VNC:
sudo apt install x11vnc
#在使用指令运行x11vnc时,不能添加sudo指令,暂时不清楚原因,目前通过x11vnc.service让vnc自动启动的功能也没有成功,初步判断和sudo原因类似。原因已找到,需要在服务配置中设置启用服务的用户名
/usr/bin/x11vnc -auth guess -forever -loop -noxdamage -repeat -rfbauth /home/USERNAME/.vnc/passwd -rfbport 5900 -shared
配置x11vnc自启动步骤,以服务的形式自启动:
-
新建服务配置文件:/lib/systemd/system/x11vnc.service,该配置文件中一定要指定启动服务的用户名,目前很多网站上的说明均没有该设置,如果没有指定用户名,那么默认是使用root账号启动服务的,此时只有使用root账号登录才可以使用VNC功能:
[Unit] Description=Start x11vnc at startup. After=multi-user.target [Service] User=michael Type=simple ExecStart=/usr/bin/x11vnc -auth guess -forever -loop -noxdamage -repeat -rfbauth /home/michael/.vnc/passwd -rfbport 5900 -shared [Install] WantedBy=multi-user.target
-
重新加载服务,启用服务
sudo systemctl daemon-reload sudo systemctl enable x11vnc.service
启动服务:
sudo systemctl daemon-reload
sudo systemctl enable x11vnc.service
sudo systemctl start x11vnc.service
sudo systemctl stop x11vnc.service
VirtualBox的驱动可能会安装不成功,需要安装依赖包:
sudo apt update
sudo apt install build-essential dkms linux-headers-$(uname -r)
sudo usermod -a -G vboxsf michael
不能使用ifconfig:
sudo apt install net-tools
在Ubuntu Desktop上安装SmartOT,需要提前安装PostgreSQL数据库,否则会报错:5432端口无法连接。
sudo apt install postgresql
如果是新安装操作系统,可能会显示”E: Unable to locate package postgresql“,那么需要先更新软件源
sudo apt update
对于Ubuntu Desktop 20.04 LTS版本,如果安装不成功,可以尝试先升级软件,升级系统软件指令为:
sudo apt upgrade
在某一次安装过程中,报错:Error reading config file (/etc/ansible/ansible.cfg): While reading from '<string>' [line 14]: section 'defaults' already exists,目前的解决方法是卸载ansible,后面安装SmartOT时,会自动检测系统有没有安装ansible,如果没有,它是会自动安装的:
sudo apt purge ansible
在安装过程中,有时会报timeout错误,此时重新运行安装SmartOT程序即可。
chmod 755 deploy.sh
sudo ./deploy.sh  -p .edge
有时候即使安装正常,也可能会有一些软件没有安装成功,具体表现为REPLICAS为0/1。测试重启系统后,重新安装一般软件应该就可以了。上述描述是错误的,其实只需要等待一定的时间,软件就会一个接一个的启动起来了,因为软件启动并不是瞬间就能完成的。
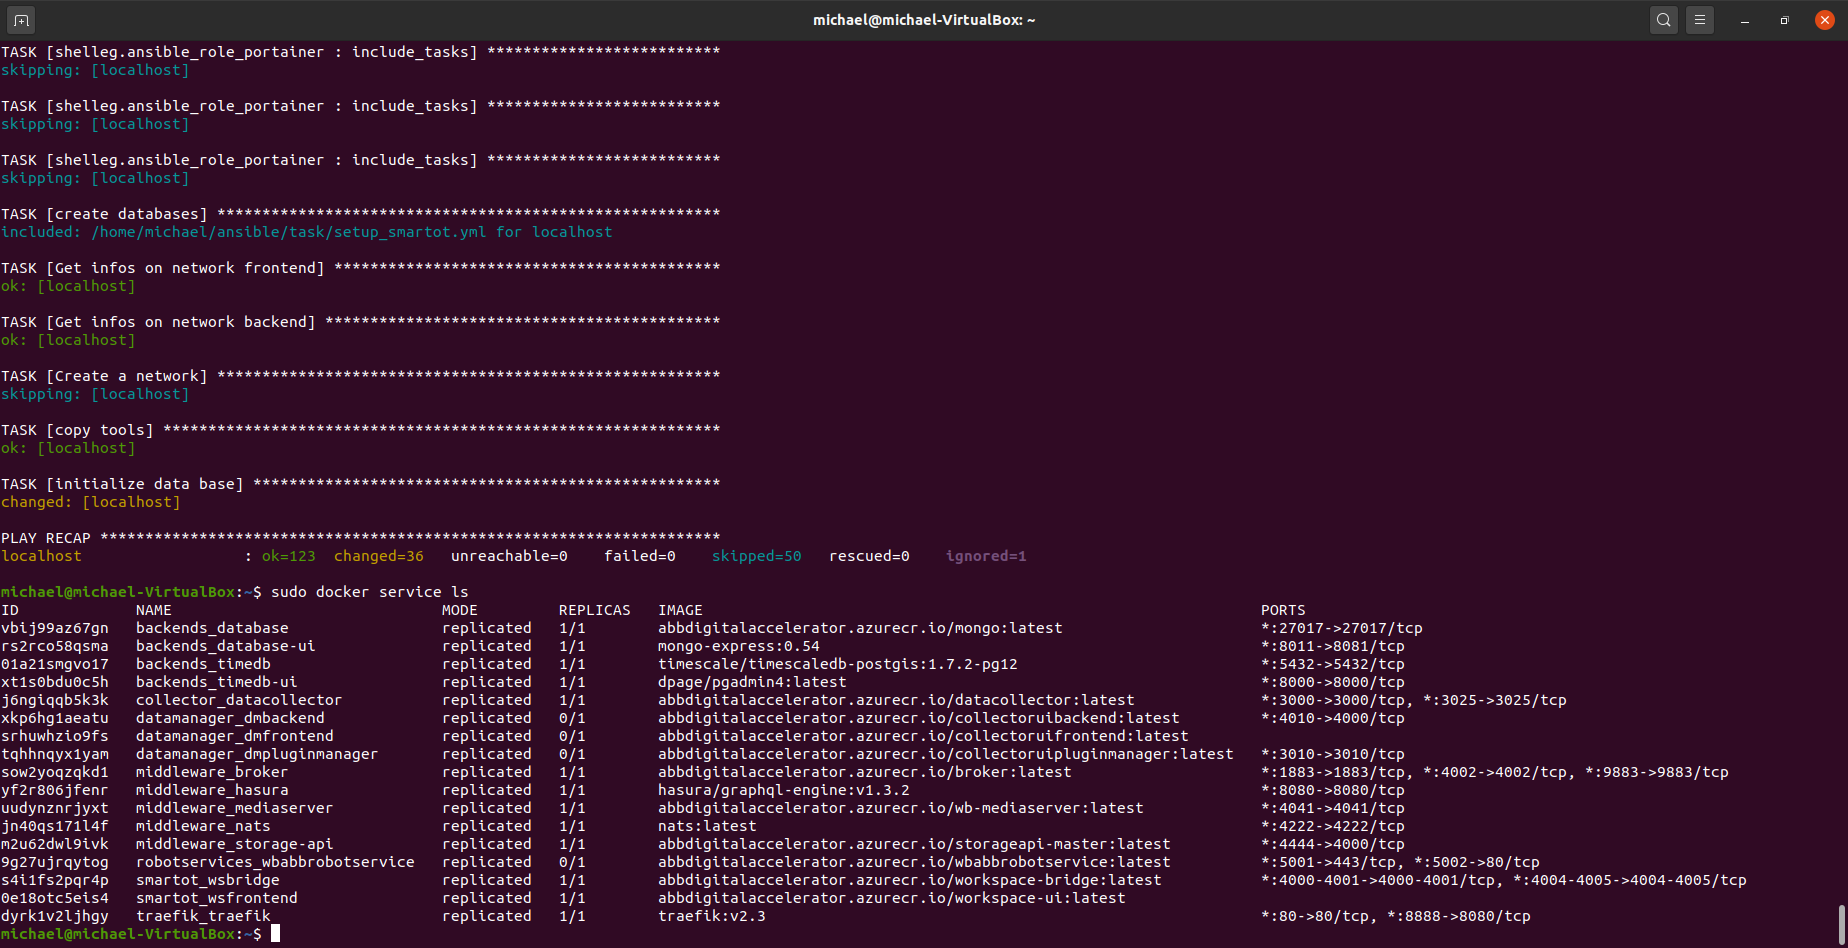
安装完毕后,运行sudo docker service ls,需要每个软件都安装正确1/1:
michael@michael-VirtualBox:~$ sudo docker service ls
ID             NAME                              MODE         REPLICAS   IMAGE                                                              PORTS
xnd3xxuukb8h   backends_database                 replicated   1/1        abbdigitalaccelerator.azurecr.io/mongo:latest                      *:27017->27017/tcp
6x2rlbmwuhoa   backends_database-ui              replicated   1/1        mongo-express:0.54                                                 *:8011->8081/tcp
lhbh1vrabiqx   backends_timedb                   replicated   1/1        timescale/timescaledb-postgis:1.7.2-pg12                           *:5432->5432/tcp
a82qnvqbz3jn   backends_timedb-ui                replicated   1/1        dpage/pgadmin4:latest                                              *:8000->8000/tcp
fx8h1qnrdfmz   collector_datacollector           replicated   1/1        abbdigitalaccelerator.azurecr.io/datacollector:latest              *:3000->3000/tcp, *:3025->3025/tcp
ijyn60aydsjm   datamanager_dmbackend             replicated   1/1        abbdigitalaccelerator.azurecr.io/collectoruibackend:latest         *:4010->4000/tcp
7v2ip7kp72b6   datamanager_dmfrontend            replicated   1/1        abbdigitalaccelerator.azurecr.io/collectoruifrontend:latest
omm3w875n8wg   datamanager_dmpluginmanager       replicated   1/1        abbdigitalaccelerator.azurecr.io/collectoruipluginmanager:latest   *:3010->3010/tcp
7vuy4nzh7l9w   middleware_broker                 replicated   1/1        abbdigitalaccelerator.azurecr.io/broker:latest                     *:1883->1883/tcp, *:4002->4002/tcp, *:9883->9883/tcp
jcv2rvrzosj8   middleware_hasura                 replicated   1/1        hasura/graphql-engine:v1.3.2                                       *:8080->8080/tcp
qqin4666g1cz   middleware_mediaserver            replicated   1/1        abbdigitalaccelerator.azurecr.io/wb-mediaserver:latest             *:4041->4041/tcp
ixucoaqhv2ee   middleware_nats                   replicated   1/1        nats:latest                                                        *:4222->4222/tcp
r4myf2y3buvl   middleware_storage-api            replicated   1/1        abbdigitalaccelerator.azurecr.io/storageapi-master:latest          *:4444->4000/tcp
x727usrso0fn   robotservices_wbabbrobotservice   replicated   1/1        abbdigitalaccelerator.azurecr.io/wbabbrobotservice:latest          *:5001->443/tcp, *:5002->80/tcp
gkr222sv7uc9   smartot_wsbridge                  replicated   1/1        abbdigitalaccelerator.azurecr.io/workspace-bridge:latest           *:4000-4001->4000-4001/tcp, *:4004-4005->4004-4005/tcp
2l12bm2khzm2   smartot_wsfrontend                replicated   1/1        abbdigitalaccelerator.azurecr.io/workspace-ui:latest
80s7l8vaf2pa   traefik_traefik                   replicated   1/1        traefik:v2.3                                                       *:80->80/tcp, *:8888->8080/tcp
测试一:安装Ubuntu Desktop 20.04.1 LTS版本时,安装系统后,运行apt update和apt upgrade,然后安装smartot,看如何安装成功?
1. sudo apt update
2. sudo apt upgrade
3. sudo apt purge ansible
4. sudo apt install postgresql
5. chmod 755 deploy.sh
6. sudo ./deploy.sh -p .edge
7. Restart
8. sudo docker service ls
9. sudo apt install build-essential dkms linux-headers-$(uname -r), maybe need restart
10. Install VirtualBox Guest Additions for Linux
11. usermod -a -G vboxsf michael
12. Restart and done
测试二:安装Ubuntu Desktop 18.04.5 LTS版本时,安装smartot,看如何安装成功?
1. Install VirtualBox Guest Additions for Linux
2. usermod -a -G vboxsf michael
3. Restart
4. chmod 755 deploy.sh
5. sudo ./deploy.sh -p .edge
6. Restart and done
测试三:安装Ubuntu Desktop 20.04.1 LTS版本时,安装系统后,不安装更新,安装smartot,看如何安装成功?
1. Install VirtualBox Guest Additions for Linux,(sudo apt install build-essential dkms linux-headers-$(uname -r))
2. usermod -a -G vboxsf michael
3. Restart
4. Ubuntu Software: Software catalog is being downloaded,这一步应该类似于sudo apt update,如果不执行这一步,可能意味着下面需要安装的软件依赖包不知道去哪里下载。这一步只是刷新软件包下载地址,并不更新软件。
5. chmod 755 deploy.sh
6. sudo ./deploy.sh -p .edge
7. Restart
8. sudo ./deploy.sh -p .edge
9. sudo docker service ls
测试四:安装Ubuntu Desktop 20.04.1 LTS版本时,安装系统后,不安装更新,安装smartot,看如何安装成功?
1. Install VirtualBox Guest Additions for Linux
2. usermod -a -G vboxsf michael
3. Restart
4. ansible -v, No ansible
5. sudo apt update
6. chmod 755 deploy.sh
7. sudo ./deploy.sh -p .edge
8. sudo apt purge ansible
9. sudo ./deploy.sh -p .edge
10. sudo docker service ls
测试五:安装Ubuntu Desktop 20.04.1 LTS版本时,安装系统后,不安装更新,先安装ansible,再安装smartot,看如何安装成功?
1. Install VirtualBox Guest Additions for Linux
2. usermod -a -G vboxsf michael
3. Restart
4. sudo apt update
5. sudo apt install ansible
6. chmod 755 deploy.sh
7. sudo rm /etc/ansible/ansible.cfg
8. sudo ./deploy.sh -p .edge
9. sudo docker service ls
测试六:安装Ubuntu Desktop 20.04.1 LTS版本时,安装系统后,运行apt update和apt upgrade,然后安装smartot,删除ansible.cfg中第二个[defaults]?如果不删除第二个[defaults],会报错:[line 14]: section ‘defaults’ already exists,该报错在Ubuntu Desktop 18.04.5 LTS中不会发生,目前不确定原因。有可能是deploy.sh的部署程序有问题,多添加了一个[defaults]。
1. sudo apt update
2. sudo apt upgrade
3. sudo apt install build-essential dkms linux-headers-$(uname -r)
4. Restart
5. Install VirtualBox Guest Additions for Linux
6. sudo usermod -a -G vboxsf michael
7. Restart
8. chmod 755 deploy.sh
9. sudo ./deploy.sh -p .edge
10. delete [defaults] in ansible.cfg
11. sudo ./deploy.sh -p .edge
12. sudo docker service ls
13. sudo apt install net-tools
14. Restart and done
安装Ubuntu后查看/etc/ansible/ansible.cfg配置是否存在?如果以下目录或文件都不存在,那么先手动安装ansible: apt install ansible,测试结果:不存在
mv: cannot stat '/etc/ansible/host': No such file or directory
chmod: cannot access '/srv/ansible/hosts': No such file or directory
cp: cannot stat '/ansible/asible_collections': No such file or directory
grep: /root/.ssh/authorized_keys: No such file or directory
Executing Ansible:
sudo -S /usr/bin/ansible-playbook -i ansible/inventories/azure ansible/site-allinone.yml -b --become-user root --connection=local -e "abb_password=.edge abbra=False iotedge="
Error reading config file (/etc/ansible/ansible.cfg): While reading from '<string>' [line 14]: section 'defaults' already exists
deploy.sh文件最后一行运行代码为:
Executing Ansible:
sudo -S /usr/bin/ansible-playbook -i ansible/inventories/azure ansible/site-allinone.yml -b --become-user root --connection=local -e "abb_password=.edge abbra=False iotedge="
Ubuntu Desktop 18.04.5
ansible 2.9.17
  config file = /etc/ansible/ansible.cfg
  configured module search path = [u'/home/michael/.ansible/plugins/modules', u'/usr/share/ansible/plugins/modules']
  ansible python module location = /usr/lib/python2.7/dist-packages/ansible
  executable location = /usr/bin/ansible
  python version = 2.7.17 (default, Sep 30 2020, 13:38:04) [GCC 7.5.0]
Ubuntu Desktop 20.04.1
ansible 2.9.6
  config file = None
  configured module search path = ['/home/michael/.ansible/plugins/modules', '/usr/share/ansible/plugins/modules']
  ansible python module location = /usr/lib/python3/dist-packages/ansible
  executable location = /usr/bin/ansible
  python version = 3.8.5 (default, Jul 28 2020, 12:59:40) [GCC 9.3.0]
When I installed the Digital Factory, I got the below error message:
mv: cannot stat '/etc/ansible/host': No such file or directory
chmod: cannot access '/srv/ansible/hosts': No such file or directory
cp: cannot stat '/ansible/asible_collections': No such file or directory
grep: /root/.ssh/authorized_keys: No such file or directory
I think this issue is due to the below wrong code in file “deploy.sh”:
sudo -S su -c 'mv /etc/ansible/host /srv/ansible/hosts.orig'
It should be like this:
sudo -S su -c 'mv /etc/ansible/hosts /srv/ansible/hosts.orig'
安装新版本SmartOT,[2.4.12] 2021-07-05 测试一:安装Ubuntu Desktop 18.04.5 LTS版本时,安装smartot,IP地址一定要设置正确,必须和当前的网卡地址一致,否则会出现在登录界面闪退问题。如果需要修改IP地址,目前的方案是重新运行sudo ./deploy.sh -e pro -p .edge -v v3.0.0 -i 10.0.2.15
1. Install VirtualBox Guest Additions for Linux
2. Restart
2. sudo apt install build-essential dkms linux-headers-$(uname -r)
2. sudo usermod -a -G vboxsf michael
3. Install VirtualBox Guest Additions for Linux
3. Restart
4. chmod 755 deploy.sh
5. sudo ./deploy.sh -e pro -p .edge -v v3.0.0 -i 10.0.2.15
6. Restart and done
安装新版本SmartOT,[3.0.2] 2021-06-09,使用IP地址安装会有问题,使用计算机名安装则可以正常工作 测试一:安装Ubuntu Desktop 18.04.5 LTS版本时,安装smartot, DataStudio有问题 1. Install VirtualBox Guest Additions for Linux 2. Restart 2. sudo apt install build-essential dkms linux-headers-$(uname -r) 2. sudo usermod -a -G vboxsf michael 3. Install VirtualBox Guest Additions for Linux 3. Restart 4. chmod 755 deploy.sh 5. sudo ./deploy.sh -p .edge -f linux 6. sudo ./deploy.sh -p .edge -f core 7. sudo ./deploy.sh -p .edge -f apps 6. Restart and done
安装新版本SmartOT,[3.0.2] 2021-06-09 测试二:安装Ubuntu Desktop 18.04.5 LTS版本时,安装smartot, DataStudio有问题 1. Install VirtualBox Guest Additions for Linux 2. Restart 2. sudo apt install build-essential dkms linux-headers-$(uname -r) 2. sudo usermod -a -G vboxsf michael 3. Install VirtualBox Guest Additions for Linux 3. Restart 4. chmod 755 deploy.sh 5. sudo ./deploy.sh -p .edge -e pro 6. Restart and done
安装新版本SmartOT,[3.0.2] 2021-06-09 测试三:安装Ubuntu Desktop 20.04.2 LTS版本时,安装smartot, DataStudio有问题 1. Install VirtualBox Guest Additions for Linux 2. Restart 2. sudo apt install build-essential dkms linux-headers-$(uname -r) 2. sudo usermod -a -G vboxsf michael 3. Install VirtualBox Guest Additions for Linux 3. Restart 4. chmod 755 deploy.sh 5. sudo ./deploy.sh -p .edge -e pro 6. Restart and done
安装新版本SmartOT,[3.0.2] 2021-06-09 测试四:安装Ubuntu Desktop 18.04.5 LTS版本时,安装smartot,使用计算机名安装,可以正常运行,但是发现网页地址还是需要使用10.0.2.15,而不能使用计算机名,而且打开datastudio时,网页会自动切换到计算机名的网址,而不是IP地址的网址https://michael-virtualbox/datastudio,其它App都只能使用IP地址的网页网址,不清楚为什么。 1. Install VirtualBox Guest Additions for Linux 2. Restart 2. sudo apt install build-essential dkms linux-headers-$(uname -r) 2. sudo usermod -a -G vboxsf michael 3. Install VirtualBox Guest Additions for Linux 3. Restart 4. chmod 755 deploy.sh 5. sudo ./deploy.sh -p .edge -e pro -i michael-VirtualBox 6. Restart and done
测试五:安装Ubuntu Desktop 18.04.5 LTS版本时,安装smartot 1. Install VirtualBox Guest Additions for Linux 2. Restart 2. sudo apt install build-essential dkms linux-headers-$(uname -r) 2. sudo usermod -a -G vboxsf michael 3. Install VirtualBox Guest Additions for Linux 3. Restart 4. chmod 755 deploy.sh 5. sudo ./deploy.sh -p .edge -f linux -i michael-VirtualBox 6. sudo ./deploy.sh -p .edge -f core -i michael-VirtualBox 7. sudo ./deploy.sh -p .edge -f apps -i michael-VirtualBox 6. Restart and done